You can build jewelry boxes from scratch, even if you have never tried woodworking before. Many beginners worry about measuring and cutting wood, keeping the box square, or using tools like saws and drills. You might also find sanding and adding hardware a bit tricky at first. Don’t stress! Start with softer woods like pine for easier handling. Grab your supplies and get ready to make something special for your jewelry.
Key Takeaways
- Begin with soft woods like pine. Gather important tools like saws, routers, and clamps. These tools help make building easier and safer.
- Measure each piece with care. Cut each part exactly using sharp marking tools. Keep your hands steady so the box fits together well.
- Use strong joints like box or miter joints. Glue the pieces well and clamp them tightly. This helps your box stay strong and look nice.
- Add compartments with trays and dividers. Line them with soft materials like velvet. This keeps jewelry neat and safe.
- Finish your box by adding good hardware. Put on decorations and a smooth finish. This makes your box look nice and last a long time.
Build Jewelry Boxes: Tools & Materials
Essential Tools
You need certain tools to build jewelry boxes well. Here is a simple list to help you begin:
- Table saw with dado blades: This tool makes straight cuts. It also helps you make rabbet joints.
- Miter sled with stop blocks: This lets you cut pieces the same size each time.
- Razor saws, fine kerf saws, and dovetail saws: These are good for small, careful cuts.
- Handheld router: This tool makes grooves and dados for strong joints.
- Carving knives: You can use these to shape drawer pulls or add small details.
- Drill press with stop blocks: This drills holes for hardware in the right place.
- Handplanes and chisels: These smooth edges and help fit pieces together.
- Clamps or tape: These hold your box tight while the glue dries.
Tip: Always wear safety glasses when using power tools. Tie back long hair before you start. Keep your workspace clean and clamp wood before cutting.
Best Woods
Picking the right wood makes your jewelry box look nice and last longer. Here is a quick chart:
| Wood Species | Advantages |
|---|---|
| Cherry | Warm reddish-brown color, smooth grain, gets richer with age |
| Mahogany | Deep color, elegant grain, strong, easy to carve |
| Walnut | Dark brown, beautiful grain, durable, many finish options |
| Maple | Light color, fine grain, strong, modern look |
| Birdseye Maple | Creamy color, unique patterns, smooth surface, easy to spot jewelry |
| Bubinga | Reddish-brown with purple, very hard, scratch-resistant |
| Curly Maple | Wavy stripes, elegant, durable, adds depth |
Most people use panels that are 0.4 to 0.75 inches thick. This keeps your box strong but not too heavy.
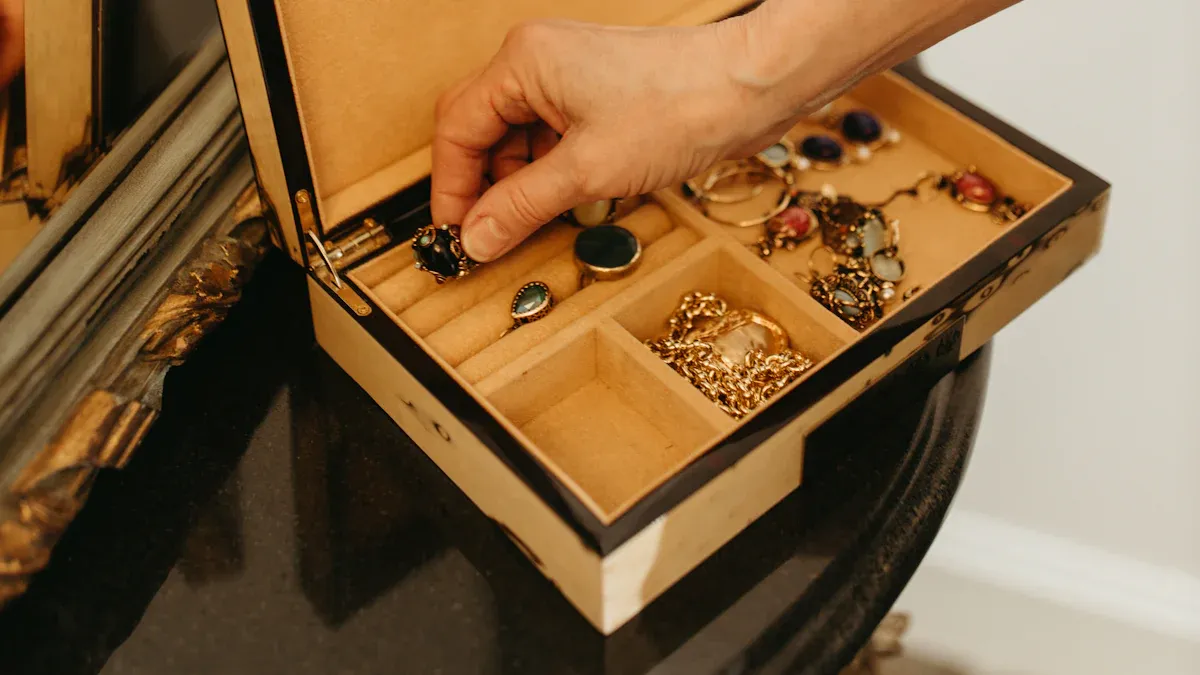
Materials for Customization
You can make your jewelry box special with linings, hardware, and decorations.
- Linings: Velvet, satin, silk, microfiber, and felt all protect your jewelry. They also make the inside soft. Anti-tarnish linings keep silver shiny.
- Hardware: Metal hinges, locks, and handles make your box safe and stylish.
- Decorative Accents: You can use epoxy resin inlays, golden floral patterns, hand-painted designs, or small carvings for a unique look.
Note: Many people now use epoxy resin with wood for a cool, modern style.
With these tools and materials, you can build jewelry boxes that look great and work well.
Cutting
Measuring & Marking
Getting your measurements right is the first step to a great jewelry box. If you want your box to fit together perfectly, you need to measure and mark with care. Here’s a simple process to follow:
- Calibrate your measuring tools. Even a small error can throw off your joints.
- Study your design plans and transfer the sizes using a marking gauge or a precision ruler.
- Measure twice before you mark. This helps you avoid mistakes.
- Use a sharp marking knife instead of a pencil. You get crisp, clear lines.
- Check your lines with a high-quality square. This keeps everything straight.
- Secure your wood to a stable surface before you cut.
Tip: Make a detailed cut list before you start. This keeps you organized and helps every piece fit just right.
Cutting Panels
Now you’re ready to cut. Use fine-toothed saws or a table saw with a zero-clearance insert for clean edges. Keep your hands steady and feed the wood slowly. This gives you smooth, precise cuts. Always check your pieces against each other as you go.
For strong corners, try using box joints, mitered joints, or rabbet cuts. Many woodworkers also use splines, beads, and rebates for extra strength and style. Glue and clamp these joints tightly. This keeps your jewelry box sturdy and beautiful.
Common mistake: Drilling hinge holes too deep or cutting grooves in the wrong spot. Mark hinge locations carefully and use a drill press with a fence for control.
Sanding
Sanding makes your box feel smooth and look professional. Start with 180 or 220 grit sandpaper if your wood is rough. If your panels are already smooth, you can begin with 400 or even 600 grit. Work your way up to 1000 or 1500 grit for a silky finish. Always sand with the grain to avoid scratches.
Patience pays off here. Take your time and check your work often. Smooth surfaces help your finish shine and make your jewelry box a joy to use.
Assembly
Box Structure
You have your panels cut and sanded. Now it’s time to put your jewelry box together. Start by laying out the sides in the order you want. Make sure the grain lines look good together. Here’s a simple way to assemble the main body:
- Cut box joints on the sides. These joints lock the corners together and make your box strong.
- Use a router or saw to create grooves near the bottom edge of each side. These grooves will hold the base panel in place.
- Dry-fit the sides and base. Check that everything lines up. Adjust if needed.
- Apply wood glue to the joints and grooves. Fit the sides and base together.
- Use clamps or strong tape to hold the box tight while the glue dries. Wipe away any extra glue with a damp cloth.
- For extra style, you can add miter joints at the corners. Reinforce these with thin wood keys. Cut small slots across each corner, glue in the keys, and trim them flush after the glue dries.
- Shape the base molding with a router. Add a round edge or a small step for a finished look. Cut and fit the molding around the bottom of your box.
Tip: Always check for square corners before the glue sets. A small carpenter’s square helps you keep everything straight.
You can build jewelry boxes with many types of joints, but these steps give you a strong and classic structure.
Lid & Hinges
A good lid keeps your jewelry safe and adds style. You have a few options for attaching the lid. Here’s how you can do it:
- Decide what kind of hinge you want. Stop hinges work well for jewelry boxes because they hold the lid open at a set angle.
- Measure the lid’s depth and weight. Use the formula (Weight x Depth) / 2 to find the right hinge strength.
- Pick a hinge that matches or beats your number. Soft-close or lift-assist hinges make your box feel fancy and safe.
- Mark where the hinges will go on the box and the lid. Attach the hinges to the box first.
- Use double-sided tape to hold the lid in place. Mark the hinge outlines and drill small pilot holes.
- Chisel out shallow recesses for the hinge leaves. This helps the hinges sit flat.
- Screw the hinges into place. Open and close the lid to check for smooth movement.
- For a pro touch, chamfer the outer edges of both the lid and box at a 45-degree angle. This stops the lid from rubbing or jamming.
Note: High-quality brass hinges look great and last a long time. Make sure the hinge pin sticks out just a bit past the box edge for smooth opening.
Filling Gaps
Even careful builders sometimes find small gaps or glue spots. Don’t worry! You can fix these for a flawless finish.
- Start sanding with 120-grit sandpaper. This removes saw marks and glue.
- Move up to 180-grit, then finish with 220-grit for a smooth surface. Always sand with the grain.
- Use a sanding block on flat areas. Hand sand the edges and corners to keep them crisp.
- If you spot a gap, fill most of it with hot glue. For tiny spaces, use medium-thick black CA glue and an activator. Let it cure.
- Trim any extra glue flush with the wood. Sand again until the surface feels even.
- Clean off all dust with a tack cloth or a blast of compressed air before you add any finish.
Pro Tip: Take your time with sanding and filling. A smooth, gap-free surface makes your jewelry box look and feel amazing.
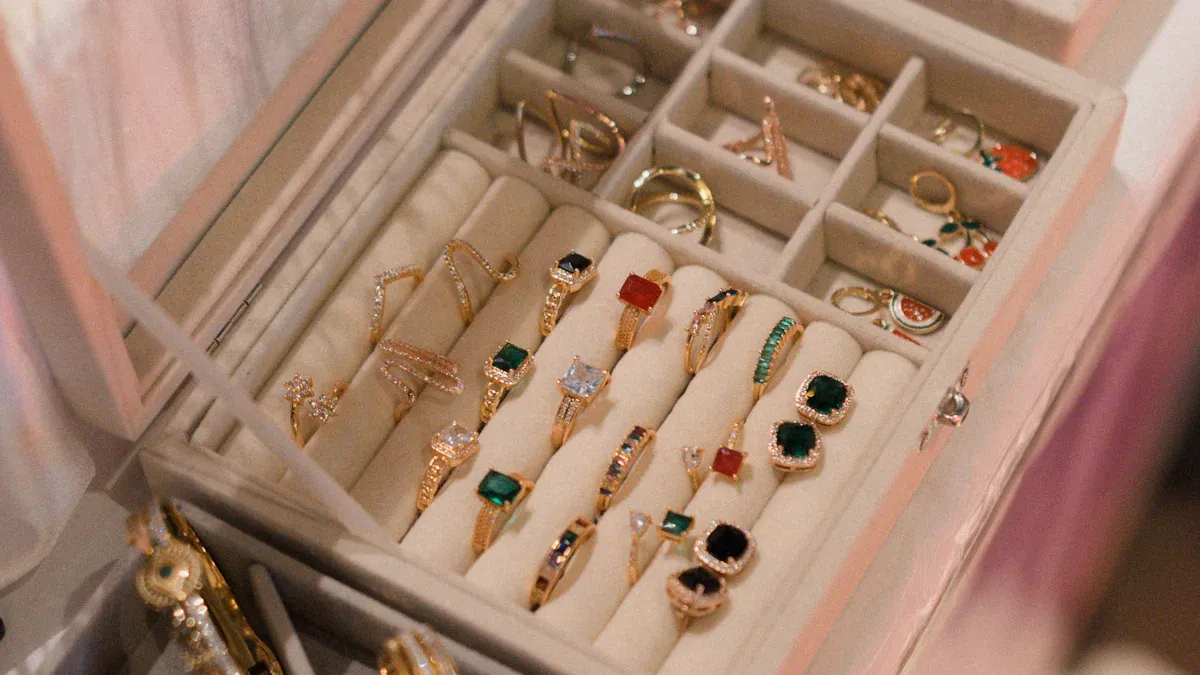
Compartments
Trays & Dividers
You can make your jewelry box much more useful by adding trays and dividers. These help you keep rings, earrings, and necklaces in their own spots. Removable trays let you lift out a whole layer of jewelry at once. Dividers split up the space, so nothing gets tangled or lost.
Many woodworkers like to use maple or a wood that stands out from the rest of the box. This gives your box a cool, custom look. If you want your trays and dividers to fit perfectly, measure each piece with care. Custom sizing makes sure everything fits “like a glove.” People often say that a jewelry box with well-fitted trays feels high quality and looks neat.
Here are some tips for great compartments:
- Use a ruler and marking knife for sharp, accurate lines.
- Cut grooves in the sides of the box to hold dividers steady.
- Try different layouts. You can make small squares for rings or long slots for bracelets.
- Make trays with finger holes or small handles, so you can lift them out easily.
Tip: If you want sharp corners and strong trays, use a grooving tool or a small router. This helps your trays last longer and look more professional.
Lining
Lining your compartments makes your jewelry box feel soft and fancy. It also keeps your jewelry safe from scratches. Velvet is a top choice because it feels plush and looks rich. Felt, satin, or microfiber also work well.
Check out this table for the best materials:
| Material Type | Key Features | Benefits for Jewelry Box Compartments |
|---|---|---|
| Wood | Sturdy and durable; classic look | Makes the box strong and gives a premium feel |
| Velvet | Soft and plush; protects jewelry | Adds luxury and keeps jewelry safe from damage |
You can glue velvet or felt to the bottom and sides of each compartment. Some people add small velvet pouches for extra protection. When you line your trays and dividers, your jewelry stays safe and looks great every time you open the box.
Finishing
Hardware
You have your jewelry box almost done. Now it’s time to add the hardware. This step makes your box work well and look polished. Start by marking where you want your hinges, locks, and handles. Use a pencil and a marking knife for sharp lines. A combination square helps you keep everything straight.
Follow these steps for a smooth install:
- Mark hinge mortises with a marking knife and gauge.
- Cut out the mortises with a chisel or router plane so the hinges sit flat.
- Drill pilot holes for screws. Put tape on your drill bit to control the depth.
- Partially drive in the screws. Adjust the hinges if needed, then tighten them.
- Use wax on screws to make them go in easier and stop the wood from splitting.
- Attach the hinges to the lid and box. Stack some wood under the lid to hold it steady.
- Finish tightening the screws, switching between them for even pressure.
Pick small butt hinges or piano hinges made from brass or nickel. These last a long time and look great. Add a vintage handle or a fancy lock if you want your box to stand out.
Tip: Sand and finish the area around the hardware after you install it. This protects the wood and makes your jewelry box shine.
Decorative Touches
Now comes the fun part—making your jewelry box unique! You can route the top of the lid into cool shapes, like a sunburst. Try using two different woods for a bold look. Engrave your name or a special design on the lid. Add wool felt inside for a soft, classy finish.
- Try these ideas:
- Sunburst or wave patterns on the lid
- Contrasting woods for the sides and lid
- Custom engravings or painted designs
- Decorative inlays or small carvings
Let your imagination lead the way. You can build jewelry boxes that show off your style and creativity.
Final Finish
The last step is finishing your jewelry box. Choose a finish that fits your taste. You can use paint, stain, or clear varnish. Wipe on the finish with a soft cloth or brush. Let each coat dry fully before adding another. This helps the finish last longer and keeps your box looking new.
Note: Always let your finish cure for several days. This makes your jewelry box strong and ready for years of use.
Take a step back and admire your work. You just learned how to build jewelry boxes that are both beautiful and useful!
You just learned how to create a jewelry box from start to finish. Making your own box gives you endless ways to show off your style and skills. Custom boxes offer great protection, unique designs, and a special touch for gifts or keepsakes. Try using cherry wood for a warm look, dovetail joints for strength, or hand-carved patterns for something truly yours.
- Custom boxes let you pick the size, shape, and color you want.
- You can add inlays, carvings, or even try curved edges for a one-of-a-kind result.
Share your finished box with friends or family. You might inspire someone else to start their own woodworking project!
FAQ
How long does it take to build a jewelry box?
You can finish a simple jewelry box in a weekend. If you add details or special finishes, you might need a few extra days. Take your time and enjoy the process!
What is the easiest wood for beginners?
Pine works great for beginners. It is soft, easy to cut, and not expensive. You can also try poplar or maple if you want a harder wood.
Can I build a jewelry box without power tools?
Yes! You can use hand saws, chisels, and sandpaper. It may take longer, but you can still make a beautiful box. Hand tools give you more control and help you learn woodworking skills.
How do I keep my jewelry box from scratching surfaces?
Tip: Add small felt pads or rubber feet to the bottom of your box. These protect tables and shelves from scratches.
What finish should I use for a jewelry box?
You can use clear varnish, oil, or wax. These finishes protect the wood and show off its natural beauty. Always let the finish dry fully before using your box.